The Title Bar contains Navigation Controls, Support Links, and Focus Area.
Navigation Controls
Navigation Menu icon is on by default.
Click to turn off.
Click to turn back on.
Navigation Tree is on by default.
Click to turn off.
Click to turn back on.
Home Icon
Click to return to Home page at any time from any screen,
Quick Launch is turned on and off for each user in User screen by system administrator.
Type name of screen in .
Click right side of or press ENTER to launch that screen in a detached screen.
Additional Links
Lock is helpful when user needs to leave their computer momentarily and does not want to lose their work, but information needs to be secured.
Click to lock Synergy SIS screen.
Re-enter password to unlock.
Sign or Log out
Click to log out of Synergy SIS and return to Login page.
Support links to a page with information about how to receive support for Synergy SIS system.
Help links to online help system and it is a separate installation.
Focus
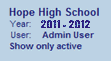
Each Synergy SIS user is setup to look at records for a specific school and year by default. Combination of school and year is called Focus. Focus sets inactive students or active students. Current focus is listed at top right-hand corner of screen. Sometimes user may want to change their focus, either to switch to a different year or to a different school.
To adjust focus:
Click on Focus. Select Focus screen displays.
Click Focus Year and select to change to a different school year.
Click on school. Information may be viewed at district or other organization group level if security level permits, but Focus must be on school to change information at that school.
Click Show Inactive Students and select from Show Active Only, Show Inactive Only or Active and Inactive to change group of students displayed.
Action Bar contains icons, buttons, and indicators for various functions specific to screen that is currently displayed.
1. Menu – contains a drop-down list of actions for screen, reports, and audit report for current screen.
2. Previous – scrolls to previous record in screen. Records are sorted in alphabetical order by first field in screen, so Previous scrolls through records in descending order by this field.
3. Switch to Find Mode – switches screen to find records instead of viewing or editing records. Fields in screen will become yellow in Find Mode.
4. Next – scrolls to next record on screen. Records are sorted in alphabetical order by first field on screen, so Next scrolls through records in ascending order by this field.
5. Print – prints current view as shown on screen.
6. Save/Find/Edit – this button changes as screen is set in different modes. In Inquiry mode, it is an Edit button that switches screen so that record can be changed. In Find mode, it is a Find button that searches for records that match information entered on screen. In Edit mode, it is a Save button to save any changes made to record on screen.
7. Undo – reverses any changes made to data in record in screen.
8. Add – opens a screen for adding records to current screen.
9. Delete – deletes current record from screen. Deletions cannot be reversed.
10. Notification – an icon appears here to alert users when a student record has a special notification attached to it, such as a custody issue or medical condition.
11, Form Status – lists current status of screen. Ready (Update Mode) means record can be edited, Ready (Inquiry Mode) means record can be viewed but not changed, and Find means screen is in Find mode where screen can be used to search for records.
12. Refresh – refreshes data in current screen.
13. Detach – opens screen in a separate browser window. In a detached screen, all normal functions on screen still work such as entering information in fields. An unlimited number of detached screens may be opened.
Title Area contains information about current screen and Quick Nav Bar.
NOTE: Depending on screen that is displaying, text content in Title Area may vary.
1. Filter - Filter icon is a funnel to left of title of screen. Filter uses a custom query to filter records displayed on screen.
2. Launch bar to quickly navigate to a particular screen.
3. Quick Nav - screens that are activated are “detached”, or opened in a new window. This means that several screens can be open at same time. Detached screens can be same screen but with different records open at same time.
To add an icon to Quick Nav bar
Right-click on an icon either in Menu Bar or in Navigation Tree. (Icon not label)
Navigation Menu bar, also called Toolbar, is a great place for storing frequently used screens and reports. Multiple bars can be created to organize screens and reports into related groups. System administrator can create bars for groups, or users can create their own bars.
Click icon to access that screen.
Inactive toolbars are listed either at bottom or top of active toolbar.
Click on group to switch between groups.
Create a User-Defined Navigation Menu
Right click in Navigation Menu area or on Default bar.
Select Add New Group. Add New Group displays.
Enter Name for new group.
Click . Add New Group screen closes. New bar containing Group name displays
Expand Navigation Tree.
Click or name to show screens in that module.
Using left mouse button, click-hold name of appropriate screen.
Drag-and-drop name into new Navigation Menu bar group.
Release left mouse button. New icon displays in Navigation Menu bar group.
Move Icons on Navigation Menu
Using left mouse button, click-hold and drag icon to new position on Navigation Menu.
Drop icon in new position.
Release left mouse button.
Delete Icons from Navigation Menu
Right click icon to be deleted. Delete (icon name) link displays.
Click Remove Icon.
Click to delete icon. Title and link is still available in Navigation Tree.
OR
Click to stop operation.
Open Duplicate screen from Icon
Place cursor over icon in Navigation Menu. Software highlights icon.
Right-click icon. Software displays a menu.
Select Open Window. Software opens appropriate screen in content area of screen.
Content area contains current screen where records are displayed and edited. Content area may display one or more tabs of information. Information on each tab must be saved separately when editing information.
Note background appearance of fields
Yellow backgrounds indicate software is in Find mode.
White backgrounds indicate software is in Ready (Update) mode.
 Title Bar